Sunday, January 27, 2013

DIY Liquid Laundry Soap


Happy Sunday, world! Usually on Sunday morning I would not be here blogging but at my favorite church family's house worshiping. However, today is it actually freezing rain and turning our highways into a bobsled track. Sad face and welcome to Minnesota.

So, instead I am catching up on household stuff. I knew that I had to make some more laundry soap. I found this recipe on Pintrest (imagine that) and thought I would give it a try. I have tried a few other homemade laundry soaps. One was a powered soap from Being Creative to Keep My Sanity and another liquid laundry soap recipe from One Good Thing by Jillee. I love the powdered soap and still use that on most of my white loads and for my hubster's really nasty work clothes. I also really liked Jillee's recipe but this other recipe was just a little more suited for my laundering needs.  

So, while making this for my own household I thought I would also share this amazing and CRAZY FRUGAL recipe with you! 

Yes. I keep my Borax in an ice cream container. ;-)
 What you will need:
1 Bar of Fels Naptha Soap, grated (I have also heard of people using a bar of Ivory or Zote soap)
1 Cup Borax
1 Cup Super Washing Soda
4 Cups Hot Water
5 Gallon Bucket

First, dump your four cups of hot water into a pot on the stove over medium heat to get it working. Grate your bar of soap and add it to your heating water on the stove. 

My grated soap. Not to be confused with cheddar cheese much to my toddlers dismay.

Stir your soap and water combo until all of the soap is melted. It takes about ten minutes for the shreds to melt.


 While waiting on your soap to melt you can start add about two and a half gallons of hot, hot, hot (your singing the song now aren't you?) water to your five gallon bucket. You don't have to boil the water or anything it just should be hot enough to get the soap mixture combined well. Your bucket should be just about halfway full.

After your soap is melted, carefully dump it into the bucket. Watch out for splashing and little people who constantly have to be 'helping'. Next, add your one cup each of Borax and washing soda. Stir it up really well with a very long spoon or whatever you can find. I use an old axe handle...cause that's how I roll.

Adding my Borax.

 Fill up the remaining space with hot water and stir again with your axe handle. 


  And that is it. Let it sit for about 24 hours to thicken up and you are ready to kill that pile of laundry. It really is too bad that there is some sort of magical concoction that will fold the clothes and put it away for you as well. I will work on that and get back to you. 

 You will use about a cup of soap per wash load. Don't freak out. I know that seems like a lot of soap for one load but I am telling you, it is so cheap to make you can still wave your El Cheapo McCheaperton Flag.

I said it was cheap and I will prove it! I get pretty much everything at Walmart. They seem to be the lowest price around so I will just give you their product prices. 

Felz-Naptha Soap: $0.97
20 Mule Team Borax : $2.99
Arm & Hammer Super Washing Soda: $2.99
Total:  $6.95


However, you are not using all of the Borax or the washing soda. So here is another breakdown. (My hubster did the numbers. I am not mathematically gifted.)

Felz-Naptha Soap: $0.97
20 Mule Team Borax : $0.44/cup
Arm & Hammer Super Washing Soda: $0.32/cup
Total: $1.73

Under two bucks for 80 loads of laundry!!!! That's bananas!!!

 I did not figure in the five gallon bucket. I was able to find mine at Runnings and it was extremely a bit over priced. Frowny face. It was something like 15 bucks for the bucket and the lid (yes I had to buy the lid separately...growl, snarl, hiss). However, once you have purchased it, you have it forever. You can shop around to find the best price. My sister also told me that you can go to certain fast-food joints or restaurants and buy their old five gallon pails for very cheap. 

So, there you have it. Five Gallons of Homemade Laundry Soap for $1.73. It doesn't get much better then that. 

Thanks for stopping and God Bless!


Thursday, January 24, 2013

Whipped Coconut Oil


Hello all! Today's post comes to you from the Great White North Country of Minnesota (like every other post I create). I reside in this chilly region with my two boys, my hubster, the Horse (Gus Gus the dog), and my ornery feline, Norma Jean. Today it was -2° when I woke up this morning. It has pretty much been below zero every day this week. That is not completely abnormal for January in Minne-Sooota (cue Fargo accent) but you do have to sort of work up to that kind of weather every year. Your bod becomes accustomed to the low temps and you deal with the constant cold all the way to your very core...but that's just me. 

Even though your body eventually gets used to it, your skin SUFFERS. Mine does every year. You know what I am talking about. Cracked lips, alligator hands, heels that you could use as sandpaper (nast). It. Is. Awful. 

Over the summer I discovered the amazing benefits of coconut oil. I had no idea it was such super-powered stuff! Check this out! Sidenote: Check out Wellness Mama, she has really great stuff! I have fallen so madly in love with the stuff that I had to dedicate an entire Pinterest board to it: Coconut Oil Awesomeness.

Anyway, coconut oil is terrific stuff. I have used it in my homemade chap-it, homemade lotions, body butters, lotion bars... The list goes on. So, all that being said I just wanted to share with you a recent discovery that my hands truly appreciate. You can whip coconut oil. You could sure put the C.O. directly on our hands as is and that does work. However, when it comes directly out of the jar it is a bit hard (depending on the time of year of course and where you are from). Whipping it just makes it a bit more user friendly when applying it to your body. Cool beans, huh? It is a pretty basic procedure, but I will document it through pics cause that's the kinda gal I am.  


Basic Pure Coconut Oil. Eventually I would like to be able to get the 
organic stuff, but I am waiting on my money tree to start producing.


Place desired amount in a bowl and whip it, whip it good. It takes a little bit of time to really get it to a nice consistency (about 3 or 4 minutes) 
but keep at it, it's worth it.

hard & crunchy verses soft & fluffy


Scoop out the fluffy, delightful C.O. and place 
in a jar with a lid and you are good to go!


 Isn't it pretty? There is is ladies and gentleman. You can use your C.O. now with ease. I like to slather my hands and arms with it. I will feel greasy at first but it will sink in quickly. I also put it on my two kidlets who have uber sensitive skin.


****Update: So it has been a week since I originally ran this post it continues to be pretty traditional here in the North. The last few days have been really nasty with lows coupled with windchills around -31°. Even for us hearty folk, that is really blasted cold. I used to use baby oil while in the shower to help with the dry skin issue. However, my sister brought to my attention that mineral oil is not the best or even safest thing we could be putting on our skin. Then I did some research and found an interesting article at Herbal Luxuries. Umm, yikes.   

So I tried something new with my awesome whipped coconut oil to combat the gator skin that is taking over my body. I used the coconut oil the same way I used to use the baby oil. After I was done with all of my washing and before I turned off the water, I put a light layer of oil on my skin. The warmth from your skin melts it immediately and all you have to do with rub it in. Turn off the water and dry yourself like normal. The oil has already trapped the moisture from the water in your skin and the oil helps hold that moisture for hours. Yay!

Thanks for stopping and God Bless!


Wednesday, January 23, 2013

DIY Hard Water Stain Zapper

Good morning, blog-reading friends! Today, I am sharing an amazing homemade cleaner that has changed the face of my kitchen forever (cue echo).  I stumbled upon the recipe through Pinterest (imagine that) and had to try it out. You can find the original source here

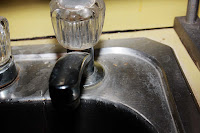
We have extremely hard water in our home and I have pretty much just come to terms with it. I hurts my skin, makes my shower look cloudy, and eventually leaves it's permanent mark on all of our white clothing. Oh well, that's life, right?  However, with a little bit of elbow grease it can be controlled. My kitchen sink really suffers the most.  I will even show you. I have to admit, it is quite shocking. If you have small children hovering over you maybe you should send them out of the room.


Vile, right? Oh, it doesn't stop there. I am not hiding anything. Here's a few more for your to cringe at.


Train wreck. You just can't look away.

So, now that I have bared my soul and the current status of my nasty kitchen sink, I will show how easily and naturally and frugally you can clean that mess.


You will need:
  • Distilled white vinegar
  • Lemon juice
  • Dish washing soap
  • Empty spray bottle (I found mine at the Dollar Tree ;-)
Fill your spray bottle about half way up with vinegar. Mine came to about 2 cups. Next, add 1/4 of a cup of lemon juice. Then fill the remaining space in the bottle up with dish soap. Screw the top back on and give it a shake. Spray liberally on the hard water stains and go find something to do for about 30 minutes. 
Soaking the nasty stains away.
 You could do your nails, read a couple chapters in your book, catch up on your correspondence... However, if you have children you can't do any of those things so maybe pick up the train tracks in your living room for the 37th time this morning.

Okay! Thirty minutes have passed and it's time to scrub and rinse!

Me scrubbing away with my steal wool.
Alright, moment of truth. Did it work? Is it clean? Did you just waist forty minutes of your life away that you can never get back?

Beauteous!

 Well, there you have it folks. A much cleaner, much better looking kitchen sink. I am now semi-happy to do my dishes in my newly sparkling sink. No, that's a lie. I hate doing dishes. This just makes it a little less annoying. 


Thanks for stopping and God Bless!


Friday, January 18, 2013

Green Citrus Cleaner


So, I come from a long line of cleaners. Cleaners as in we live pretty much in a constant state of clean chaos. I have two boys, ages two and six, and a thrid that I am married too and they Messy McMessy Pants'. Every. Single. One. Pig Pen from Peanuts comes to mind. I try desperately to keep it sort of organized but mostly just clean. Others may look at my house and freak out because it cluttered, the furniture is old, the kitchen made up of primary thrift-ed goods, and their are toys, literally, from one end of my house to the other. But, it is clean. Very clean.


Now, I don't ALWAYS love to clean. There are days when the last thing in the world I want to do is pick one more pair of dirty underoos off the bathroom floor.  But there comes a sort of satisfaction when the house has been cleaned. I even love cleaning solutions. Strange huh?? It really is. I love the paper goods and chemicals aisles at the grocery store. A cornucopia of different chemicals to clean up every single type of mess under the sun.

Now, all that being said, in an attempt to better our lives and strengthen our bodies inside and out, I have been slowly weeding out all of the chemical laden cleaners in my house and switching to all natural cleaners. I was extremely skeptical at first. Can they really clean as well as the expensive Lysol and Clorox cleaners?? I noticed my sister using this homemade cleaner and then I had to do some research (because that is the kind of person I am). Apparently I have been living under a rock because there were tons of recipes out there like this and this. Sidenote: Read everything by Jillee. She is a blogging ninja. There is only two ingredients and one of the two ingredients is something that you typically throw in the garbage. Nice huh? So not only is is green and safe for the kidlets but it is crazy cheap. 


Green Citrus Cleaner
  • First fill a jar with citrus peels (just the peels, eat the insides ;-). 
  • Next, fill the jar up with vinegar just to cover the peels. Screw on the top and let the mixture sit for about two weeks. 
  • Then, strain out the peels, pour it in a spray bottle and you are ready to rock. You can use it on pretty much anything. I use it on my kitchen counters, in my bathroom, and on my tile floors. 
 
That's it! Done and done. Homemade green cleaner. Easy peasie.  

Thanks for stopping and God Bless!

No Fail 'Hard Boiled' Eggs from the Oven


It's inevitable. Hard boiled egg disaster. I will never forget the year I was asked to bring Deviled Eggs to our annual Thanksmas celebration with my father. I feared the worst and I was justified in my fears. The Deviled Eggs were a complete catastrophe. I think there was maybe two that came out looking like actual eggs. The others...well, I was pretty ashamed. However, I brought my eggs to the party with my head held high. They were all still consumed in record timing so at least they tasted delicious. 

So all is well, right? Wrong! It has always bothered me that I can't peel a decent egg. It is one of those things that just drives me up the wall. Like burnt toast and broken bread and people who don't use their turn signals. So, after years of faulty egg peeling experiences, I have discovered a miracle here! Making my hard boiled eggs in the oven! It sound bananas, right?! But it works! I swear!  My sister also blogged on this hard boiled egg masterpiece at 31 Cups!


No Fail 'Hard Boiled' Eggs in the Oven

First, grab your eggs and place them in a muffin tin. It keeps them from rolling about.

Next, put them in a 325° oven for 30 minutes.


There it is. Thirty minutes later you have beautiful hard boiled eggs there weren't boiled. And the best part is that they peel perfectly! No more creepy looking Deviled Eggs! Hooray!


Note: The little specs are completely normal. They are just little imperfections on the shell that browned up in the oven. ;-) Also, they color up beautifully. 

Thanks for stopping and God Bless!

Homemade Vanilla Caramel Latte


Coffee just an A.M. thing? Not for this girl! Sometimes it is the only thing that I am able to consume until about two o'clock in the afternoon. Typically, I am a coffee with a little bit of creamer kinda gal. However, every now and then, I like to take it up a notch. I am such a rebel, I know. Like a faithful internet junkie, I found this recipe here via Pinerest like I pretty much find all of my recipes these days. A Homemade Vanilla Caramel Latte. That's right, folks. Complete with foamed milk and all! 

I know what you are all thinking, you Java-lovin' peeps. Does it taste just like Starbucks or Caribou? Well, I am not entirely sure because I live pretty much in the middle of nowhere Minnesota so the nearest coffee house is about 35 to 45 minutes away. However, you can guarantee that it is a fraction of the price of one of those crazy fru-fru drinks from Starbucks. And you can make it in your own house without even having to put your bra on. Can I get an Amen?


Homemade Vanilla Caramel Latte

Yield: Enough to fill 14 oz coffee mug with room for foam or whipped cream


Ingredients
  • 3 tablespoons French Vanilla Coffee-Mate Liquid Coffee Creamer
  • 2 tablespoons caramel sauce
  • 2/3 cup double-strength hot brewed coffee
  • 1 cup milk (I have used whole & 2%)
  • Optional: whipped cream and additional caramel sauce
Instructions
  1. In a large coffee cup, combine creamer and caramel sauce. Pour in your hot coffee and stir until everything is well combined.
  2. Heat milk (not to boiling) in small saucepan over medium heat, whisking constantly to create foam. You can use a wisk but I but if you have a Magic Kitchen Wand (other wise know as a handheld blender) it will create the most beautiful foam. Yay for thrift store gold!
  3. Remove milk from heat and carefully pour into your coffee cup. Use a wooden spoon to hold back the foam. Next spoon our beautiful foam into your cup. 
  4. Optional: Add whipped cream and additional caramel sauce on top and viola!
Congratulations! You have just shamed the nearest Starbucks by making a righteous latte all by yourself!
 
You can, of course, can alter it accordingly. For example, if you want to make on the skinny side, substitute for light creamer and skim or 1% milk.

I have also toyed with different variations of flavors. I tried Peppermint Mocha Latte as well. I just substituted the French Vanilla for International Delight's York Peppermint Patty creamer and then used chocolate syrup instead of caramel. 

Thanks for stopping and God Bless!

Pin It button on image hover